Tips to Keep Your Design Projects Organized
As a designer, I’m not afraid to admit that I’m not the most naturally organized person. 🙈 And maybe you can relate that? My desk is a mess of dirty coffee cups and sketchbooks. My Illustrator files are all over the place with 30+ versions of a logo concepts scattered across the screen and 10 unlabeled layers.
And honestly? The creative mess is fine! That part can stay messy. But here's what can't: the stuff your clients see and experience. The tasks. The feedback process. The way files are shared. The onboarding. If that stuff is disorganized, it doesn't matter how beautiful your work is. Clients will feel the chaos, and it will affect how they perceive you as a professional.
I've been doing this for over 10 years, and building systems for my client projects has been one of the single biggest things that's improved both the quality of my work and my client relationships! So if you're just starting out with your first freelance clients, or you're coming from an agency or corporate background where someone else always handled the project management side of things, this one's for you.
Here's how I keep things organized, and why each piece matters.
01 / Set up a consistent folder structure and save it as a template.
Before a single file gets created on a new project, I set up my folder structure. Same folders, every time. Having a consistent system means I'm never hunting for something mid-project, and my clients always know where to look for things too.
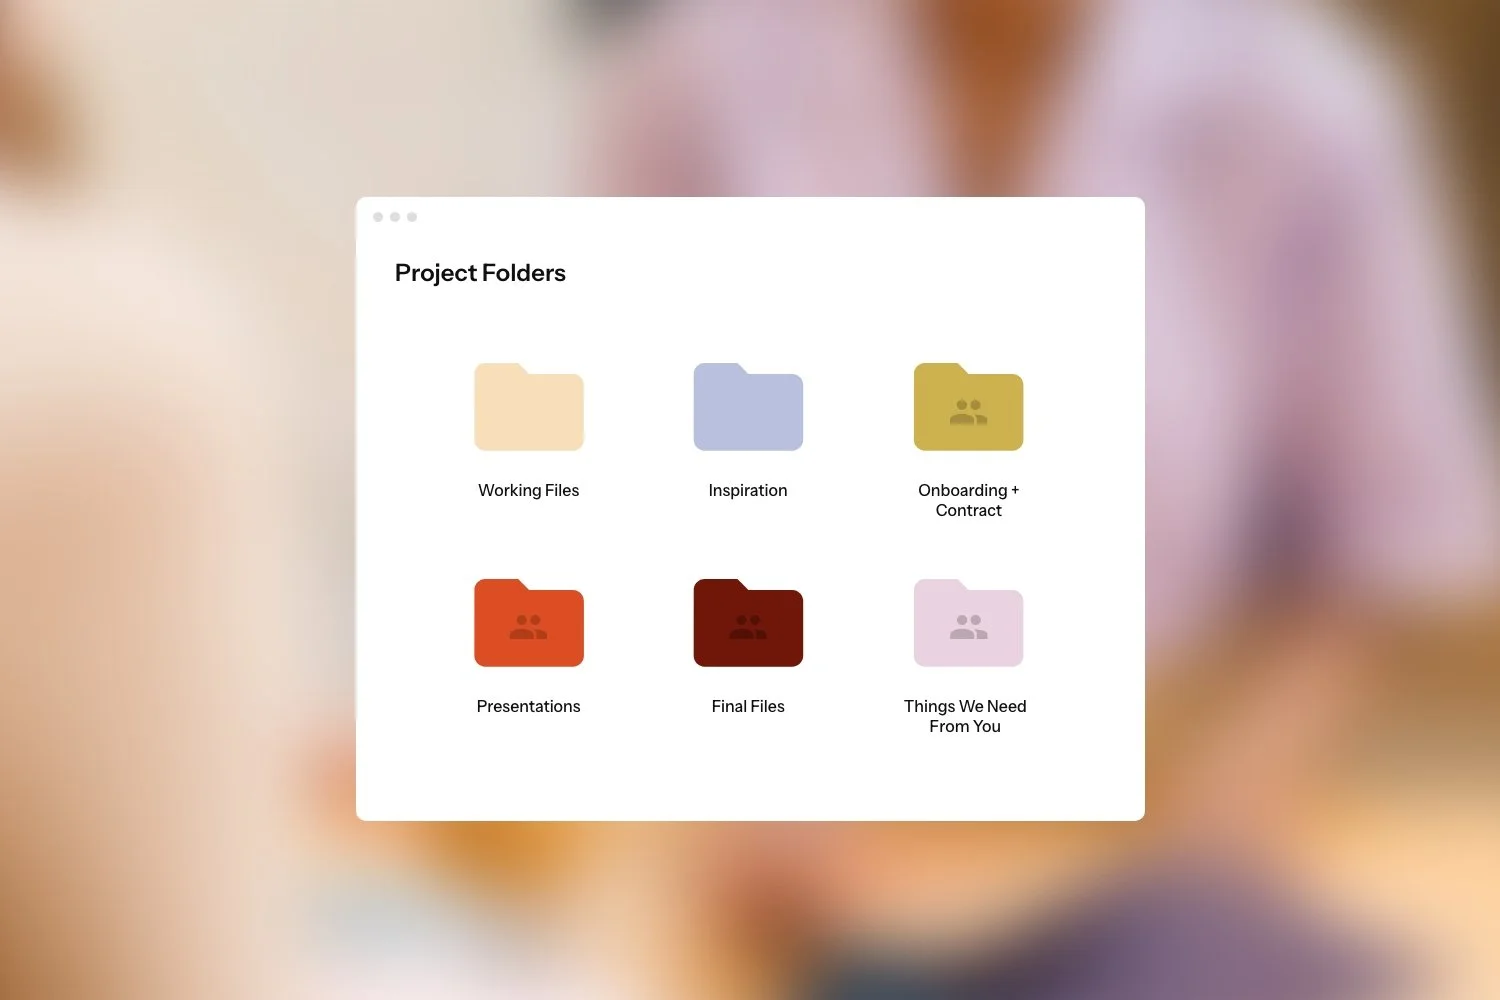
Here's what my standard project folder looks like:
INTERAL PROJECT FOLDERS (Stuff that’s just for me)
🎨 Working Files – This is my messy creative space. Illustrator files, Photoshop mockups, anything that's internal and still in progress lives here.
💡 Inspiration: Mood boards, creative direction, reference images, anything that informed the visual approach. I keep those things here so I can easily find them instead of having to dig through my Downloads or Screenshots folders.
CLIENT-FACING FOLDERS (Stuff clients have access to)
📑 Onboarding + Contract: This is where I save a copy of things the client might want to reference again after we’ve started, like our signed contract and an onboarding guide that walks through our project timeline, what to expect while working with me, etc.
▶️ Presentations: Every presentation and concept walkthrough goes here. Clean, clearly labeled, easy to find.
⚠️ Things We Need From You: Whenever a project requires the client to submit info to me, I add this folder so they know where to save those things. It might be website copy, packaging dielines, brand photos. Whatever it is, I’ll make sure there’s a document inside this folder that gives them specific instructions on what’s needed and best practices for putting it together. Things like SEO tips, page-by-page content guides, and image sizing guidelines.
⬇️ Final Files: Created at the end of the project. This is where all the final, saved-out, ready-to-use deliverables live. Logo files, brand assets, packaged exports — all organized and clearly named.
I use Google Drive for this, which means I can share the folder directly with my client. And inside Tezzera, I can actually link that Google Drive folder in the files tab so clients can access everything right from their project without having to dig through their own Drive! It keeps everything centralized in one place.
The key tip here: once you land on a folder structure you like, save a blank template version of it so you can duplicate it at the start of every project. Setting this up fresh each time is wasted effort.

02 / Use custom task statuses to show exactly where things stand.
Most project management tools give you the basics: Not Started, In Progress, Completed. And those are fine as a starting point, but they don't tell the full story of a design project, especially when a client is involved.
I use custom task statuses in Tezzera that make it immediately clear what's happening with each task and who the ball is in the court of. Mine include things like:
Waiting on Client Copy — so it's obvious when a task is stalled because I'm waiting on something, not because I've dropped the ball
Ready for Review — signals to the client that something is ready for their eyes
Action Needed — for tasks that require something specific from the client, like granting access to their Shopify account or sharing brand assets
Custom statuses remove the ambiguity that causes follow-up emails and confusion. When a client can look at their project and immediately see 'oh, there are two tasks waiting on me,' they know exactly what to do next without you having to chase them.
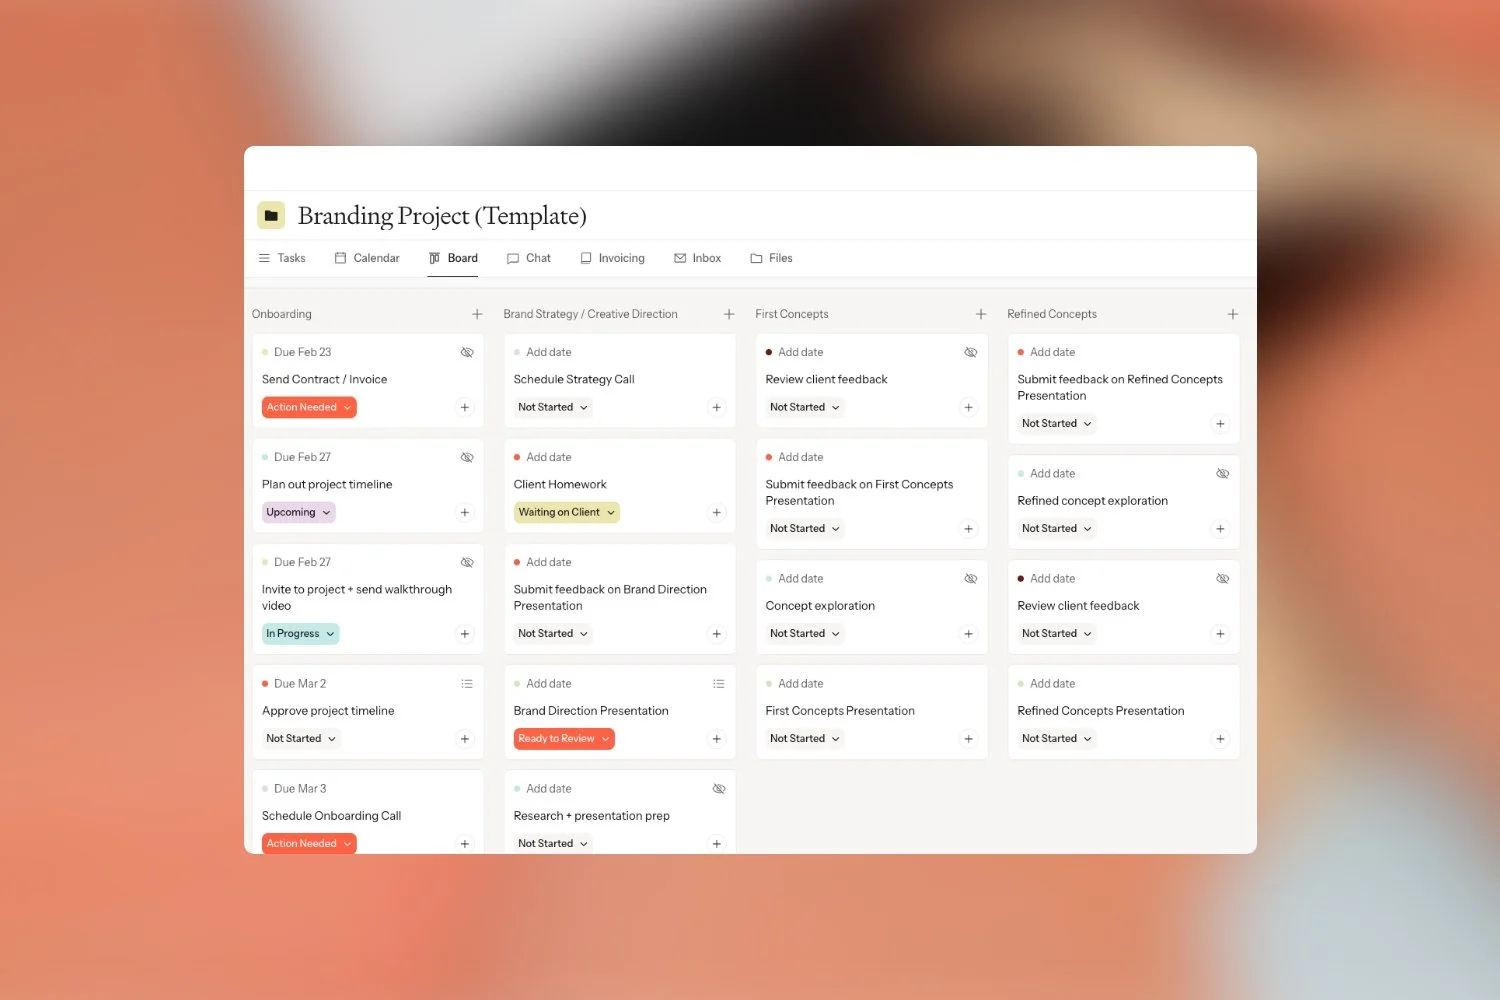
03 / Group tasks by project phase so progress is visible.
I organize all of my tasks into groups based on the phase of the project we’re in. So for a branding project, I might have groups for Creative Direction, First Round of Logo Concepts, Second Round of Logo Concepts, Packaging, and Website. For a longer multi-phase project, grouping by phase makes a lot of sense because it shows exactly where you are in the process and gives everyone that satisfying moment of crossing off an entire phase before moving on.
But phase-based grouping isn’t the only way to do it, and honestly the best approach depends on your project type and how your brain works. Here are a few other grouping methods worth considering:
A Resources Group
This is one I really like for making things insanely easy for clients to find! Create a group at the top of your project that never gets completed. Inside it, add tasks that link directly to the contract, the invoice, important documents, anything the client might need to find again later. These tasks aren’t action items, they’re just always there as a reference point. If you find that clients are constantly asking “where do I find my invoice?” a Resources group usually solves that immediately.A "Due This Week” Group
For projects where priorities shift week to week, keeping a “This Week” group at the top works really well. You move urgent tasks into it as they come up, and your client always has a clear view of what needs attention right now without having to scroll through the whole project. Great for longer engagements or retainer-style work.Simple “To Do” / “In Progress” / “Done” Groups
For smaller, more straightforward projects, you don’t need anything elaborate. Three groups is plenty. Keep it simple and it’ll actually get used.
There’s no single right answer here. The best grouping system is the one that makes your specific project easy to navigate. Play around with a few approaches and you’ll quickly figure out what clicks for you.
One more thing worth mentioning: once you land on a setup you love, you don’t have to rebuild it from scratch every time. In Tezzera, you can save any project as a template and reuse it for future projects. So whether you’ve got a perfect branding project structure, a go-to website project layout, or a simple three-group setup for smaller jobs, you set it up once and it’s there whenever you need it.
04 / Use colors and icons to make your task list scannable.
This one sounds small but it genuinely makes a difference, especially on bigger projects with a lot of moving parts! In Tezzera, you can assign a color and icon to each task. I use this to visually categorize what kind of task it is at a glance. For example, the important tasks where the client needs to send me something or take urgent action are always a bright orange color and use the notification icon to really grab attention in the task list. Presentation tasks are always green with the “play” icon. Meeting tasks are purple with a calendar icon.
When you're scanning a long task list, visual cues work a lot faster than reading every line. It sounds like a small thing until you actually have it and then can't imagine going back!
05 / Put your review call link everywhere.
This is a slightly unconventional one, but it's become a non-negotiable in my process. I include a link to book a review call in the description of every single presentation task. It's in my feedback forms. It's referenced in my onboarding.
The reason: I've found that when clients have frictionless access to book a call, we move faster. They don't have to send an email asking about my availability, I don't have to respond with a scheduling link, and we don't lose a day or two to that back-and-forth. The call link is just always there, ready to go.
P.S. If you're worried about clients booking wayyyyy too many calls (been there, trust me), Tezzera actually lets you set a limit on how many calls can be booked during a project! So you get the convenience without losing control of your calendar.
06. Onboard your clients properly — don't assume they'll figure it out.
This is the one I see newer designers skip most often, and it causes so much unnecessary friction.
When you've been doing this for a while, your project setup feels obvious to you. You know where everything is and how it all works. But your client is seeing it for the first time. If you just send them a login link and assume they'll figure it out, they won't — or at least, they'll spend way more time confused than they need to.
So to avoid confusion, you need to have some kind of onboaring process in place! I like to do a short onboarding call with every new client where I walk them through the project setup live on Zoom. I walk them through our project timeline, show them where their tasks are, where to find presentations, how to submit feedback, and how to book a review call. It takes maybe 20 minutes and it saves so much back and forth.
If calls aren't your thing, a quick Loom walkthrough works just as well! Record it once and you can reuse it as a template for future clients, customizing the details as needed.
One thing we're actually building into Tezzera to help with this is a interactive platform tour that’s just for clients! When a client gets invited to join their project, Tezzera will automatically give them a mini guided tour of the platform, showing them where everything lives. So even if you don't have time for an onboarding call, your client won't be left staring at the screen wondering where to start.
The goal isn't perfection. It's clarity.
You don't need a complicated system. You just need enough structure that your clients always know what's happening, where to find things, and what's expected of them.
The creative side of your work can be wonderfully messy. But the client experience? That needs to be simple, clear, and easy to navigate. That's what builds trust, reduces friction, and honestly makes the whole project more fun for everyone involved.
If you're looking for a tool that makes all of this easier to pull off without juggling three separate platforms, that's exactly what Tezzera was built for. Custom task statuses, grouped project phases, feedback forms, file integration, scheduling — it's all in one place, and it's designed to actually look good while it does the job.
We're opening back up soon. If you want to be first to know, click here to join the waitlist.